

How To Make Jungle Animals Out Of Fondant
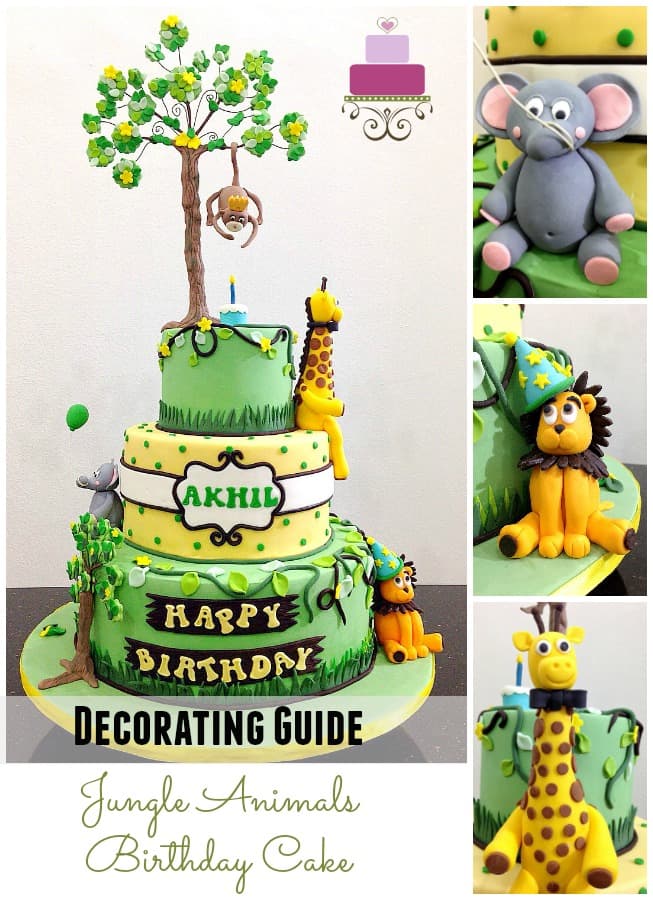
I made this jungle animals cake for a 1-year former boy'southward birthday. The party theme was centered around jungle animals and the mother requested me to design a block to lucifer the theme. She also had theme colors for the party, which were light-green and yellow, and then I made sure to have those 2 colors as the main ones on the cake. She also requested that the birthday boy is represented with a monkey topper!
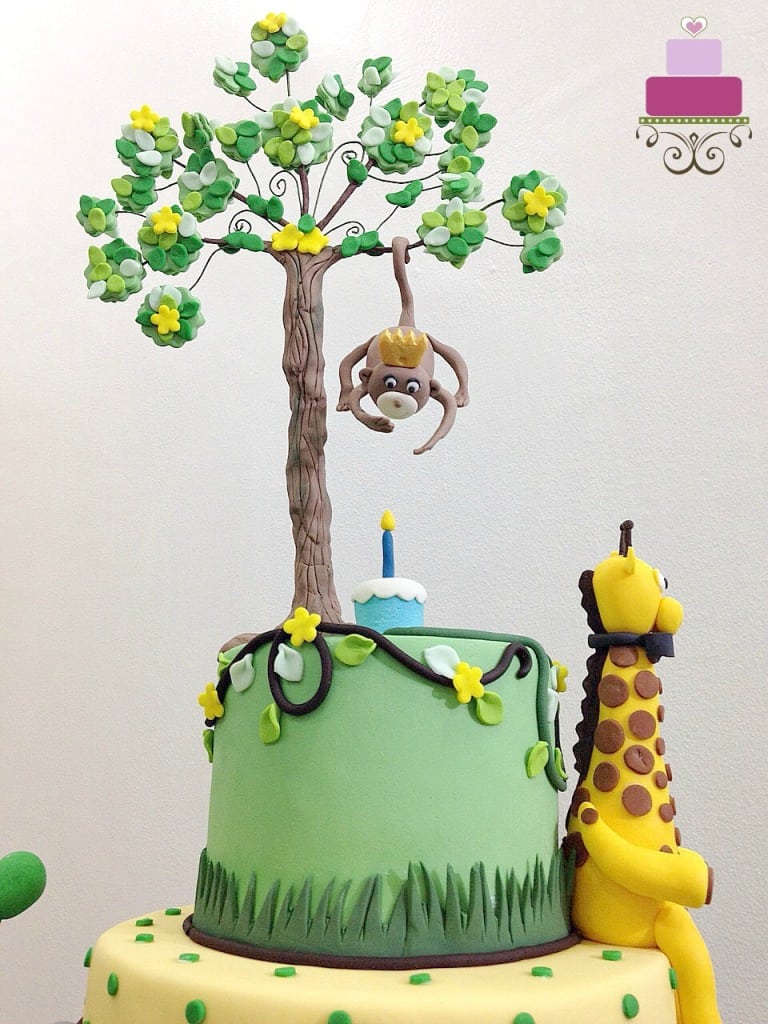
Making this cake was actually fun and a real challenge too. Fun because I had the liberty to design the cake instead of my customer dictating the design to me. Challenge because I had this brave idea of making a 3D monkey swinging by its tail on a tree on top of the block while bravado his altogether candle. And I wanted the monkey to be able to literally swing when rocked.
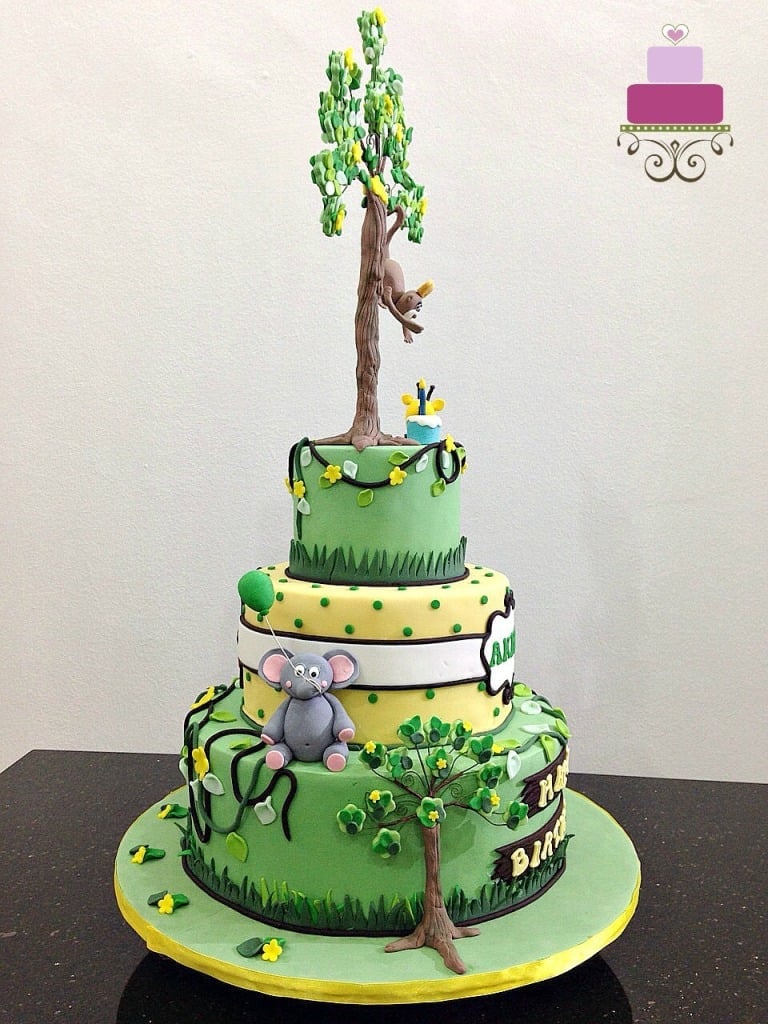
Jungle Animals Cake
Making a 3D monkey and hanging it onto a branch, though may sound like a unproblematic idea, was on the contrary, quite catchy. The tail had to be stiff enough to hold the weight of the monkey and its easily and feet as well had to be positioned such that all looked natural when assembled.
I must admit, I spent a considerable amount of time trying to become that little fella'southward hands, anxiety and tail in place. The rest of this jungle animals birthday cake ornamentation was pretty straight forward. Everything on the block was handmade with fondant including the tree, which had wires for support and the animals had Styrofoam balls within them equally the base.
How to Make a Jungle Animals Cake
Main supplies for the jungle themed animals block:
Raw materials
- Cake – this was a 3 tier block measuring 6 inches, ix inches and 12 inches in bore. And each tier was 4 inches high. I cannot think the cake recipes I used for each of the tiers, just they were all from my cake recipes collection hither.
- Buttercream – Each tier of the block was filled with buttercream. I also used buttercream to crumb coat each cake tier before covering them with fondant.
- Fondant – I used Satin Ice for the entire project. Some were prepare to use colors namely pastel yellowish, chocolate brown, yellowish, orangish, greenish, blue, white, pink, red and black. I also used food colors to tint white into navy blue (using Americolor Navy Blue ), light green (using Americolor Avocado ).
- Shortening and fondant glue – I used these interchangeably, shortening for smaller lighter fondant pieces and the gum for heavier ones.
- Aureate Dust and lemon extract – I mixed these to form edible gold paint for the crown on the monkey.
- Green petal dust - I used this to give more depth to the tree trunks on the cake.
Tools
- Floral wire – These were to make the 3D trees on the block, the monkey'southward hands, legs and tail besides every bit the string on the balloon held past the elephant. I used 18 approximate for the body (nearly three for the trunk and used thinner guess wires for the branches. I joined these wires to the 18 gauge wires with brown floral tape). Equally for the monkey and the balloon, I used 24 approximate .
- Brownish Floral Tape
- Styrofoam balls – these measured about 3 cm in diameter and were used as the base for 2of the animals, i.e., the elephant and lion.
- Extruder tool – I used this for the block border likewise as the vines, and borders for the plaques on the cake.
- Plunger cutters in oval , circular , v petal flowers , star and hearts – the oval ones were mainly for the leaves on the tree, round for the polka dots on the second tier, v-petal flowers for the leaves base on the smaller tree, stars for the king of beasts's party chapeau and centre for the two Red hearts on the plaques.
- Gerbera daisy petal cutter – I used this to make the king of beasts'south mane.
- Clikstix Groovy Alphabet Cutters
- Plaque cutters – I used ane for the birthday boy's name and the other for the words, 'Our Prince is ane'.
- Scalloped round cutter gear up – I used the smallest cutter for the larger 3D tree on the cake.
- Pizza cutter – this was a general cut tool
- Needle Tool – This was mostly to mark the trunk grain design on the 3D tree trunks.
- Sugar Craft Knife
- Fondant shaping tools – these were used to help in shaping the deco that was placed on the cake every bit well as the animals.
Animal Toppers on the Animals Cake
I started past preparing the animals toppers first. All of them were formed by paw. And I used one Styrofoam brawl each equally the base. There are ii reasons for using Styrofoam balls. Firstly, information technology saves on my fondant. Secondly, the animals set much faster. And are much lighter too. This was particularly important for the monkey topper as its entire weight was supported past its thin tail. Having a lighter weight makes a lot of departure.
I had a total of 4 fauna toppers – the monkey, giraffe, elephant, and lion. I did non capture step by step images of making these animals, simply I do have the close-up pictures.
The monkey cake topper
The giraffe cake topper
The elephant block topper
The lion cake topper
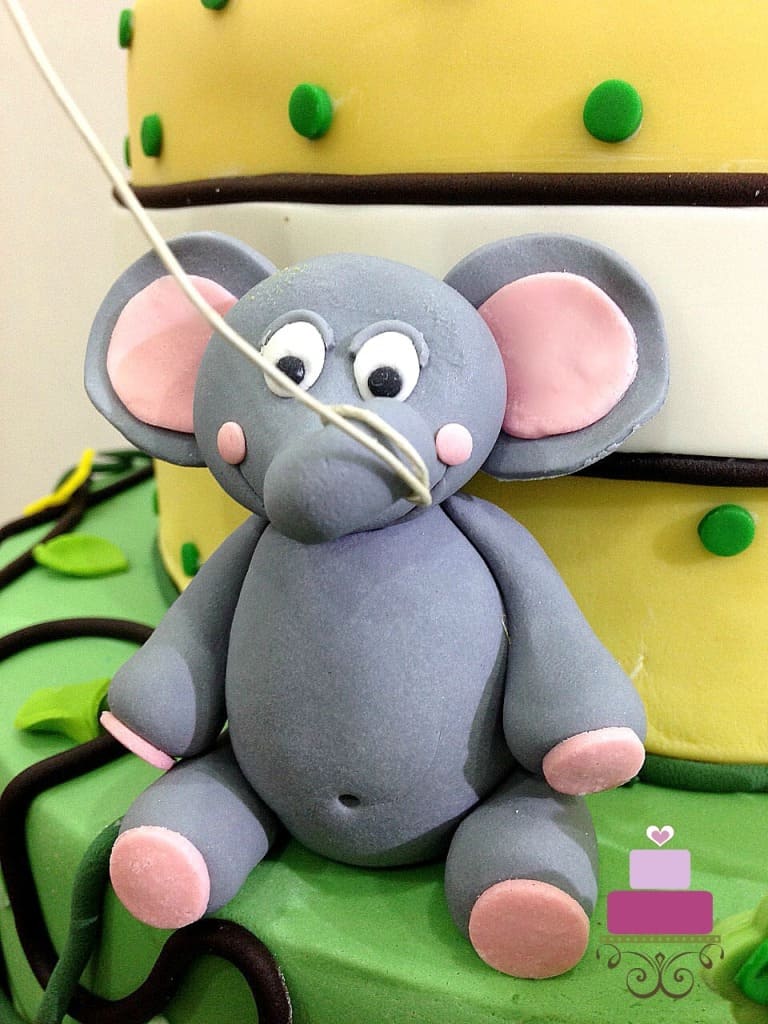
How to Make the Elephant Cake Topper
Mixing the fondant
- I started by mixing white and black to create the grayness fondant. And then, using ane Styrofoam brawl equally the base of operations, I formed the elephant'southward body.
The caput
- Side by side was the head. To make the head, I formed a large tear driblet with the tip non so pointed. And then, I refined the tip to class the elephant trunk and the base of the tear drop as the face up. I used the end of my piping tip to imprint the elephant's mouth and attached 2 small pinkish balls on each corner.
The eyes
- For the optics, I formed 2 white ovals, added ii smaller dots of black and added thin eyelids made in grey on each eye.
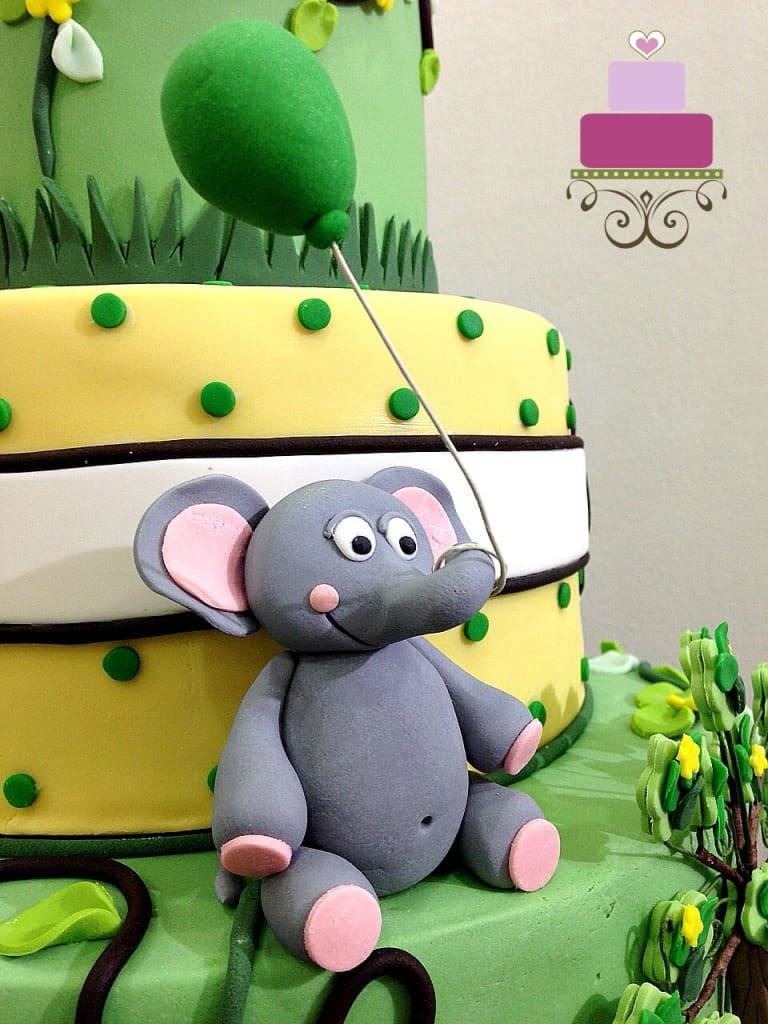
A beautiful elephant cake topper on the jungle animals cake
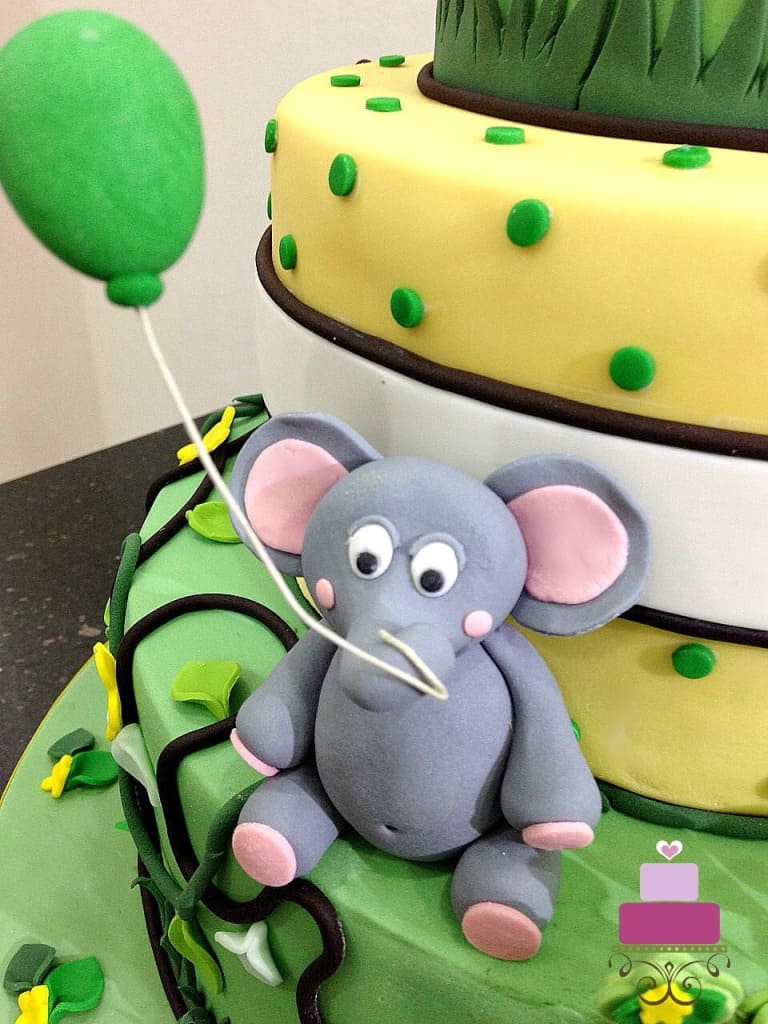
The elephant ears
- This animal's ears were fabricated in grey and pink. And so were the hands and legs. All were formed by hand. I started past pinching out 2 equal-sized pieces of grey fondant, rolled each into equal-sized sausages, and then pressed i of each ends thin. I and then used glue to attach the flattened part of the legs to the elephant's body.
The elephant paws
- For the animal's paws, I cut out pocket-size circles of pink and attached to the paws with shortening. The hands were formed in a like manner also. And finally, I used my skewer to marker the elephant's belly button!
The balloon
- As for the balloon, I made it with fondant but the string property it was floral wire. I poked one stop of the wire into the balloon (I fabricated the balloon in accelerate and permit information technology gear up before putting it on wire as I did not want to risk the wire poking through the moisture fondant of the balloon) and the formed a loop on the other terminate. In one case the elephant was gear up and house, I carefully inserted the loop through the elephant torso.
The elephant holding a balloon on the animals cake
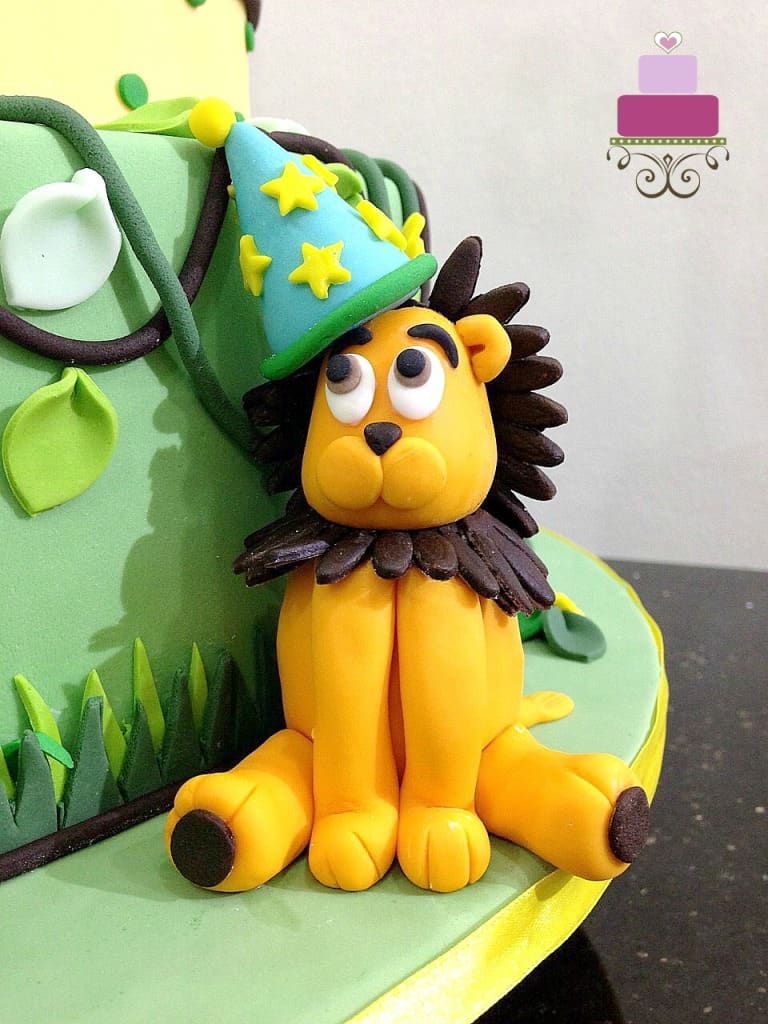
How to Make the Lion Cake Topper
The torso and confront
- This guy was pretty easy to make. I used orangish and brownish mostly, with a picayune bit of white and blackness for the eyes. I as well used my gerbera daisy mold to make the mane. Similar to the elephant, I used a small Styrofoam ball every bit the base of operations. And then I formed the caput and fastened the panthera leo's optics, nose, mouth and eye brows and 1 ear (the other ear was not necessary every bit the political party hat was supposed to cover information technology).
The legs
- Next were the easily and legs. Again, each i of these started off as sausage-shaped pieces. For the hands, I formed the paws on one end and flattened the other ends thin by pressing them with my fingers.
The paws
- For the animal'southward paws, I used my carbohydrate craft knife and cut iii shallow lines to marking the lion's paws. And the I fastened the easily to the panthera leo'due south body. Adjacent were the legs which were formed almost similar to the hands except that the opposite ends of the paws were not pressed thin. Instead, they were flattened and attached to the torso with some glue. And for the paws, I added small round dark-brown pieces.
The lion mane
- For the mane, I used my smallest gerbera daisy cutter and made iii pieces in brown. 1 piece went in between the trunk and the face while the other 2 pieces went to the dorsum of the lion's head. I attached all with mucilage.
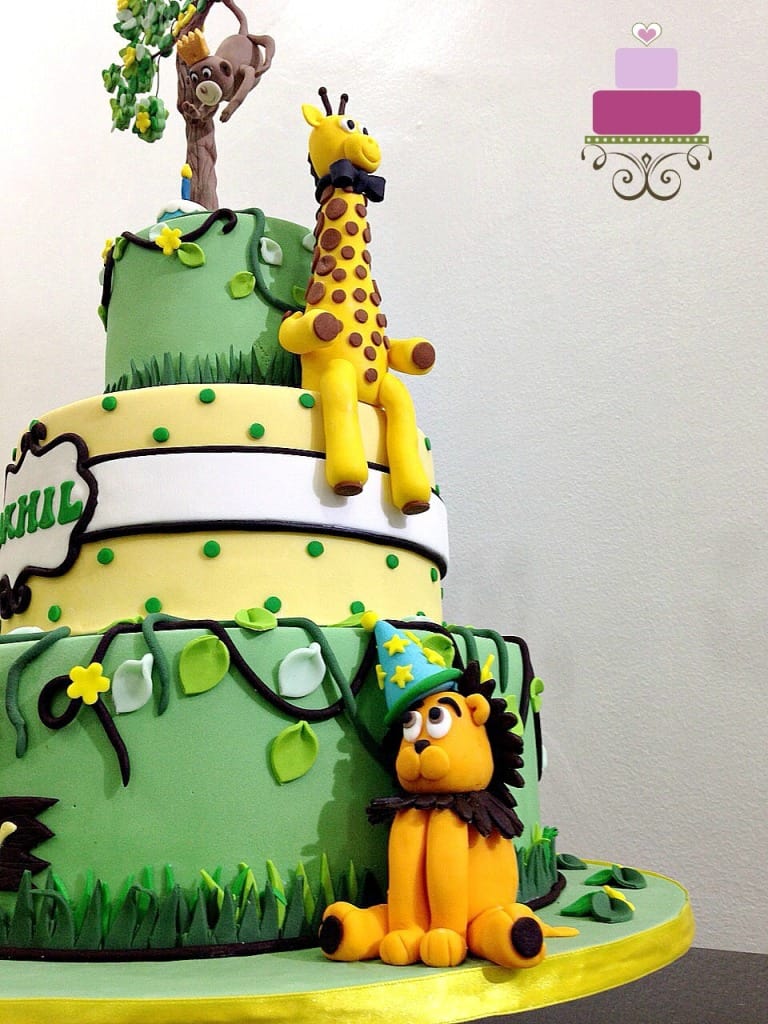
An adorable lion cake topper for the jungle themed animals block
The party hat
- Side by side was the animal'southward political party chapeau in blue fondant. I shaped information technology into a cone and topped it with a tiny yellow ball. And then I added yellow stars all around it. And finally, I rolled a sparse strip in dark-green and fastened it effectually the base of the blue cone with glue. I permit the lion set firmly before attaching the political party hat to it.
- And finally, I added the king of beasts's long tail.

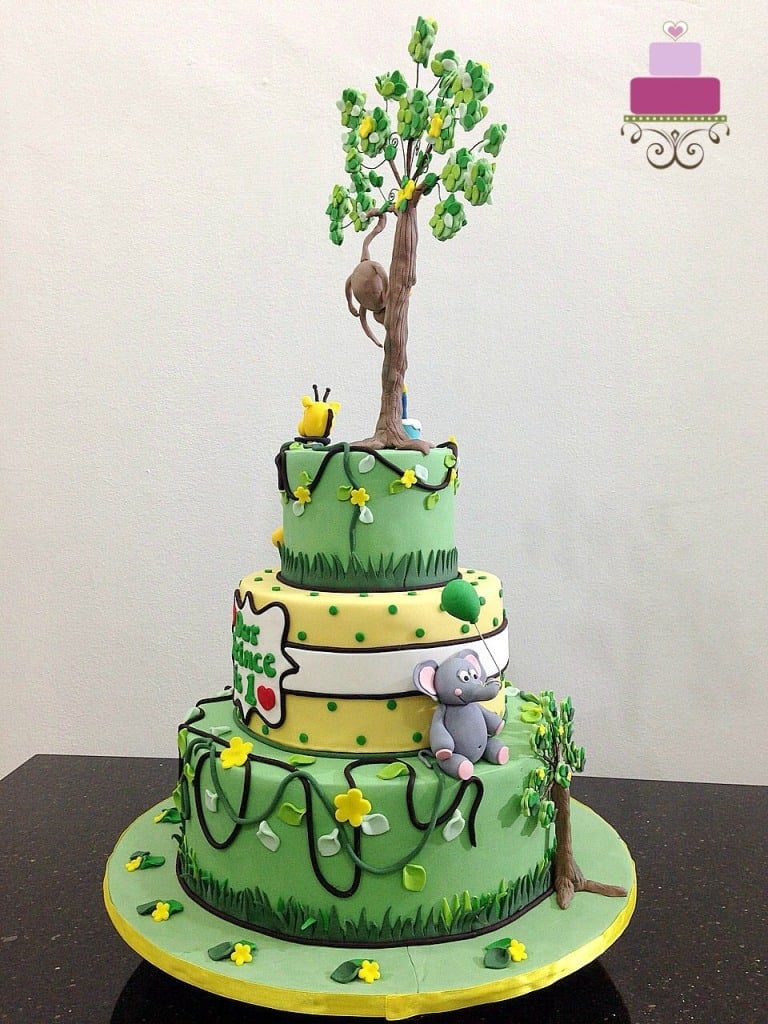
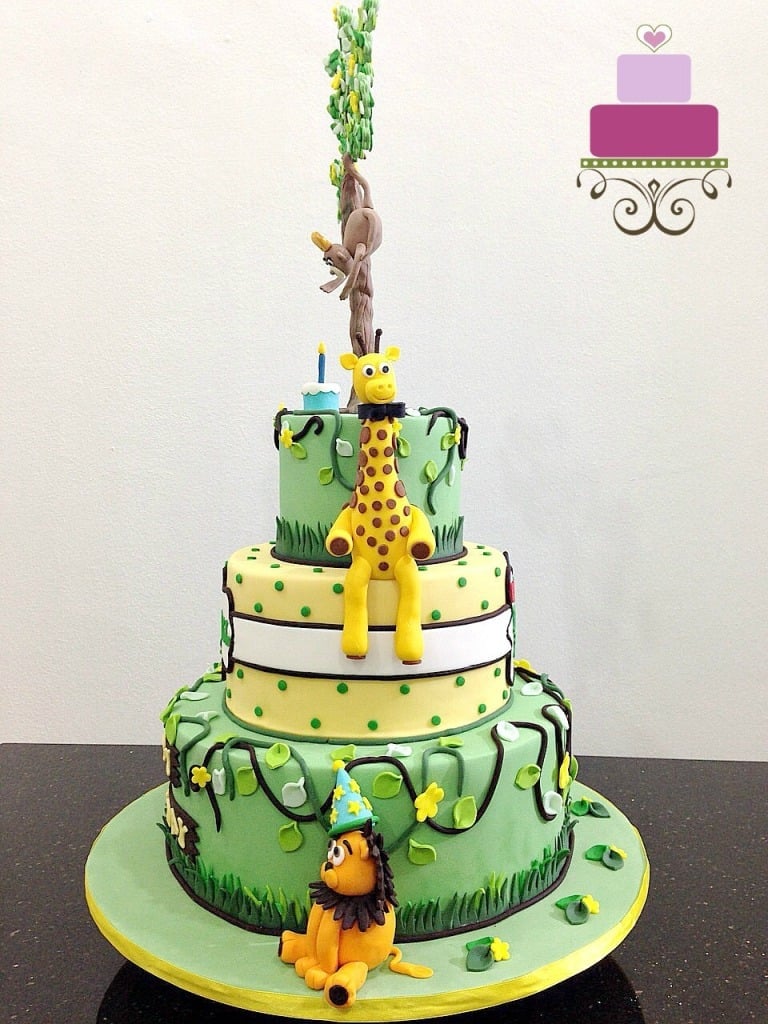
The back of my 3 tier jungle animals cake
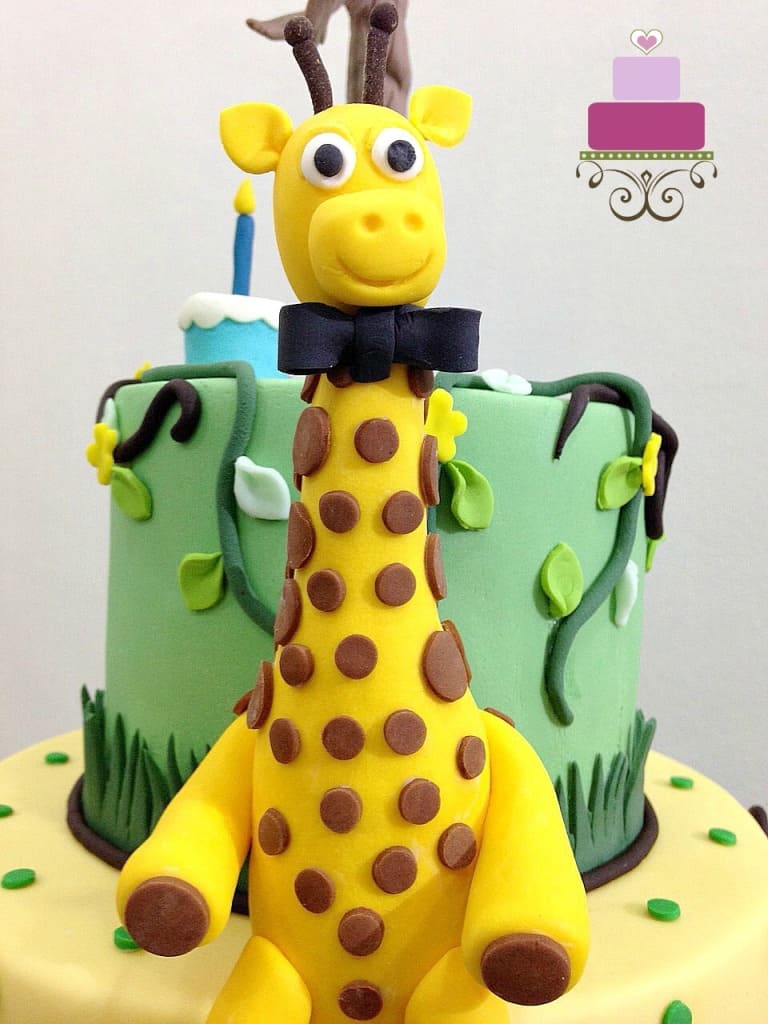
How to Brand Giraffe Cake Topper
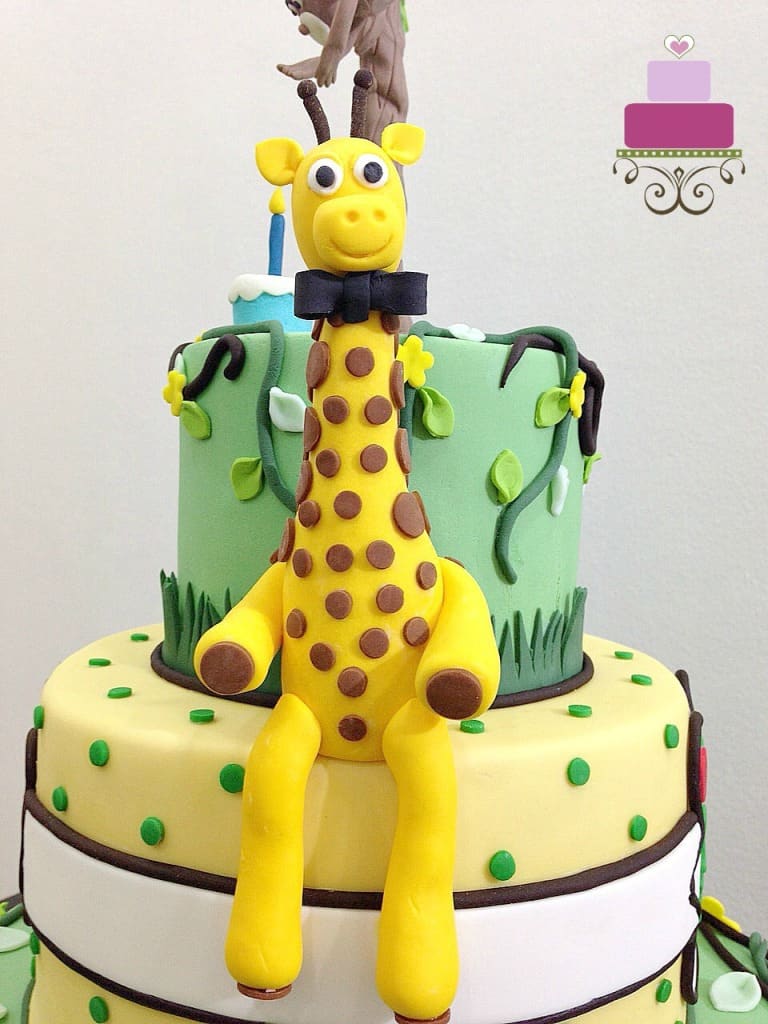
A smart looking giraffe cake topper for the jungle themed 1st yr birthday animals block
Colors for the giraffe
- Next was the giraffe topper. I used 5 colors for the giraffe namely xanthous, calorie-free chocolate-brown, chocolate brown, blackness and white. The body was made using white fondant tinted with Wilton golden yellowish. The brown dots on the giraffe were chocolate brownish fondant that has been lightened with some white fondant. The giraffe's horns and mane at the back of its neck were made using chocolate chocolate-brown fondant. The blackness was for the bow and optics while the white also went of the eyes.
Forming the giraffe torso and head
- To make the giraffe, I started off past rolling my fondant into a short fatty sausage. And and so I continued rolling one end to make it long and thin. This terminate was to grade the neck and the other end was for the body.
- Side by side was the head. I formed a round ball and then rolled it slightly to elongate information technology. And and then I formed another modest yellow brawl, pressed it flat with my fingers and attached to the front of the face up equally the mouth. I used my skewer to marking the nostrils and the dorsum of my piping tip to mark the mouth.
- I formed the optics in white and added black eyeballs to it. For the ears, I used my oval plunger cutter. I used my fingers to brand ane end of each eye pointy and pinched the other end so that they get folded slightly. I fastened these to the caput with mucilage.
The horns
- Next were the animal's horns. I rolled 2 equal sized thin brownish pieces into thin sausages and attached them to the peak of the giraffe's head. To assistance the horns stay in place while the gum dries, I formed 2 small dents on the head with the cease of my brush and attached the horns into these dents. That way, it was so much easier to keep them in place. Once they had become business firm, I attached tiny dark-brown ball on each horn, also with mucilage.
The legs and hooves
- I left the caput to set aside while I worked on the giraffe's hands and legs. The steps I took to class these were like to the elephant and lion above. However, this time, since the legs were hanging from the side of the cake, when making the giraffe, I placed it on a piece of round Styrofoam and let the legs hang on its side while waiting for the giraffe to set and for the residual of the block decoration to exist ready.
- Once the hands and legs were in place, I cut out pocket-size circles (in ii dissimilar sizes) in dark-brown. I attached them randomly on the body. I as well fastened the dark-brown circles for the hooves.
Close up of the giraffe cake topper on the jungle animals cake
The giraffe'south mane and the bow
- So I added the head followed by the giraffe's mane which I cut using the scalloped blade of my pizza cutter. I attached the mane using glue.
- And so I added a black bow around the animal's neck. The bow was simply a thin strip of black wrapped around the neck and some other slice of the same sized black fondant that was formed into a bow.
Side view of the giraffe topper on the jungle animals cake
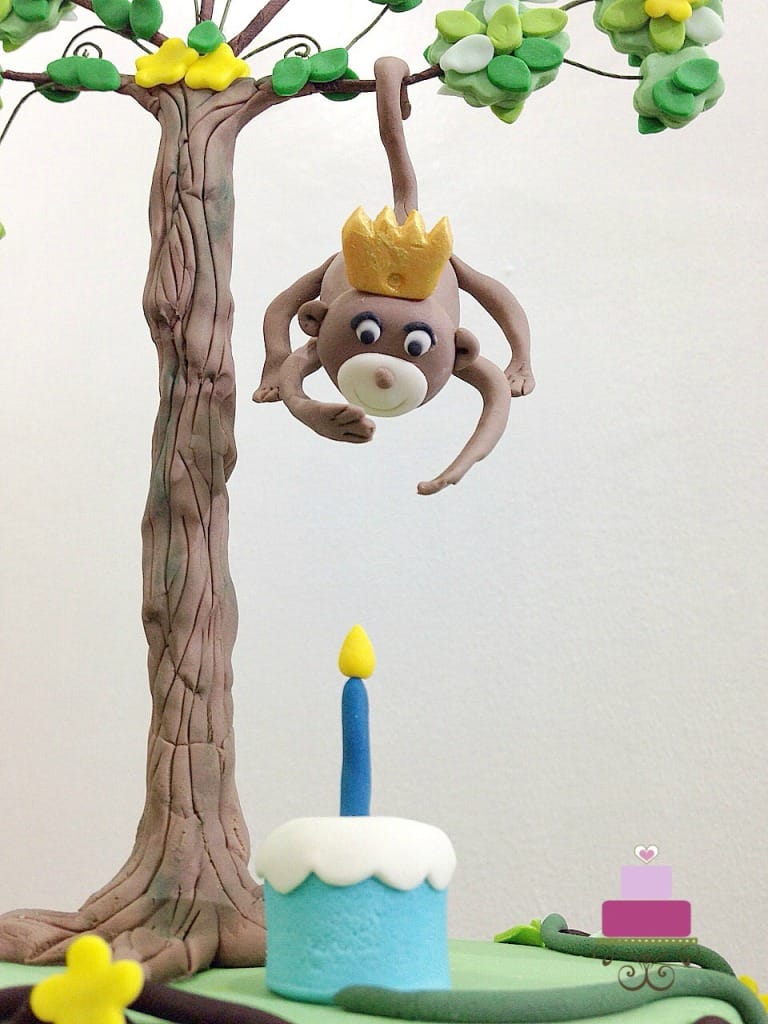
How to Make the Monkey Cake Topper
Cute monkey, literally swinging from a tree on the animals cake
- This was the trickiest of all the 4 animals on this cake. And that was only considering this little guy was to hang onto a 3D tree branch by his tail.
- The body had a Styrofoam brawl as the base and the hands and legs were all wired. I formed them in fondant and slowly insert a thin wire through each arm and leg and then attached them to the body.
- The tail was too wired. And I shaped information technology into a claw so that information technology will be easy to hang him upwardly on his tail on the tree branch equally well as easily take him off the tree. This was because I needed to take him off the tree when transporting the cake so that all the shaking during the drive does not disassemble his tail off the body.
- The caput was made entirely of fondant. Then was the crown (white painted in gold). The eyes, rima oris, nose and ears were all made of fondant likewise.
The back view of the monkey topper on the completed animals cake
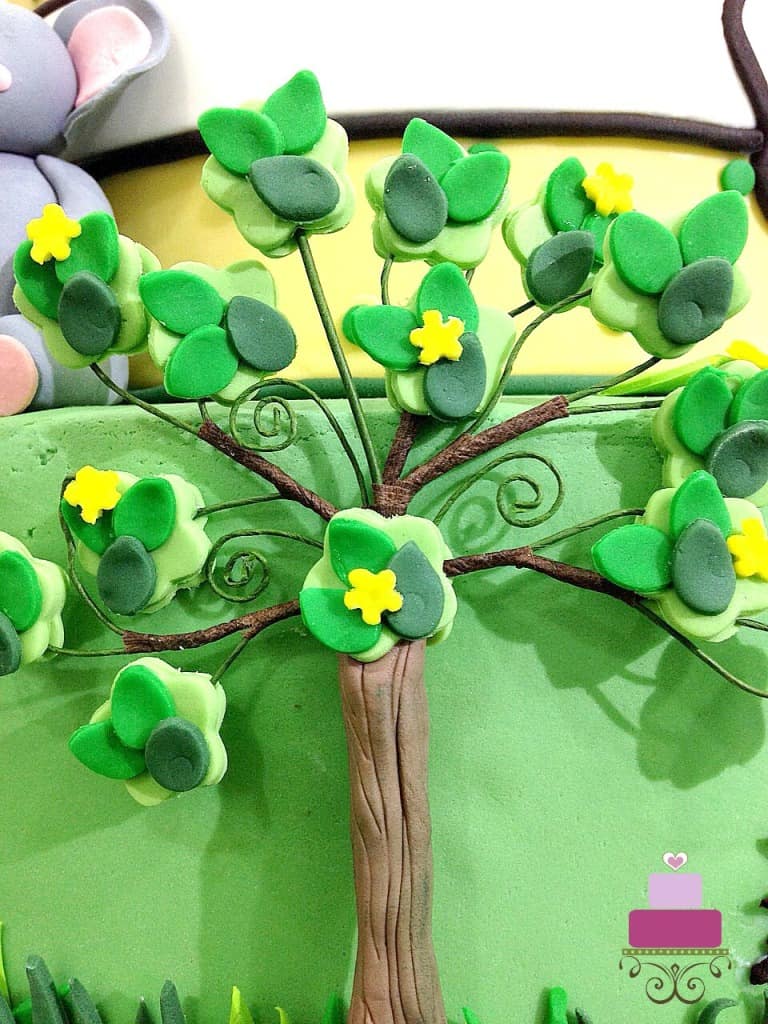
How to Make Fondant Tree
- I had 2 of these copse on the cake. The larger i on top of the cake as a topper and a slightly smaller 1 on the side of the 3rd cake tier. These trees were made using floral wire. If you see closer, you will observe that all the branches on each tree are wires. I used thicker wire (eighteen gauge) for the body for more than stability. For the branches, I used thinner wires (gauge 24). To bring together these thinner wire to the trunk, I used brown floral tape. I also used the tape to tape the branches that were coming out of the tree truck together.
- For the wood grain blueprint on the trunks, I used my needle tool and drew the pattern by hand. And then I dusted information technology with dark green petal dust.
- As for the leaves, I cutting out green pieces of round scalloped pieces (using the smallest cutter in my scalloped cutter set. I used my 5-petal bloom plunger cutter for the smaller tree) and glued ii pieces together randomly on the wire branches (with the wire branches sandwiched in between). And so I used my oval plunger cutter for the leaves in a few dissimilar shades of green. I attached the leaves randomly on the scalloped pieces.
- I likewise attached xanthous flowers on the tree. These were fabricated using my small bloom plunger cutter.
How to Assemble the Jungle Animals 1st Twelvemonth Birthday Block
Blistering the cakes
- Once all the cakes were baked and have cooled down, I leveled, filled and crumb coated them with buttercream. And and so covered I them with fondant. The first and third tiers were in green (Americolor Avocado nutrient color mixed with white fondant) while the second tier was in pastel xanthous. So, I stacked them all up.
The birthday male child's name
- Next was the fun part i.e., the decoration. I started by putting upwardly the birthday boy's proper noun and all other lettering on the block. For the plaques on the second tier, I used plaque cutters. The wooden planks on the 3rd tier were strips of chocolate brown. I cut these by hand.
- One time the lettering was all done and fastened to the cake, I completed the second tier decorations by adding a white fondant ribbon all around the tier.
- To frame the white plaques and the fondant ribbon around the cake, I used my extruder tool to pipe sparse rolls of brown. I attached this every bit the border, with shortening. And and then I finished off the second tier with light-green polka dots using my circle plunger cutter and green edge (piped using the extruder tool).
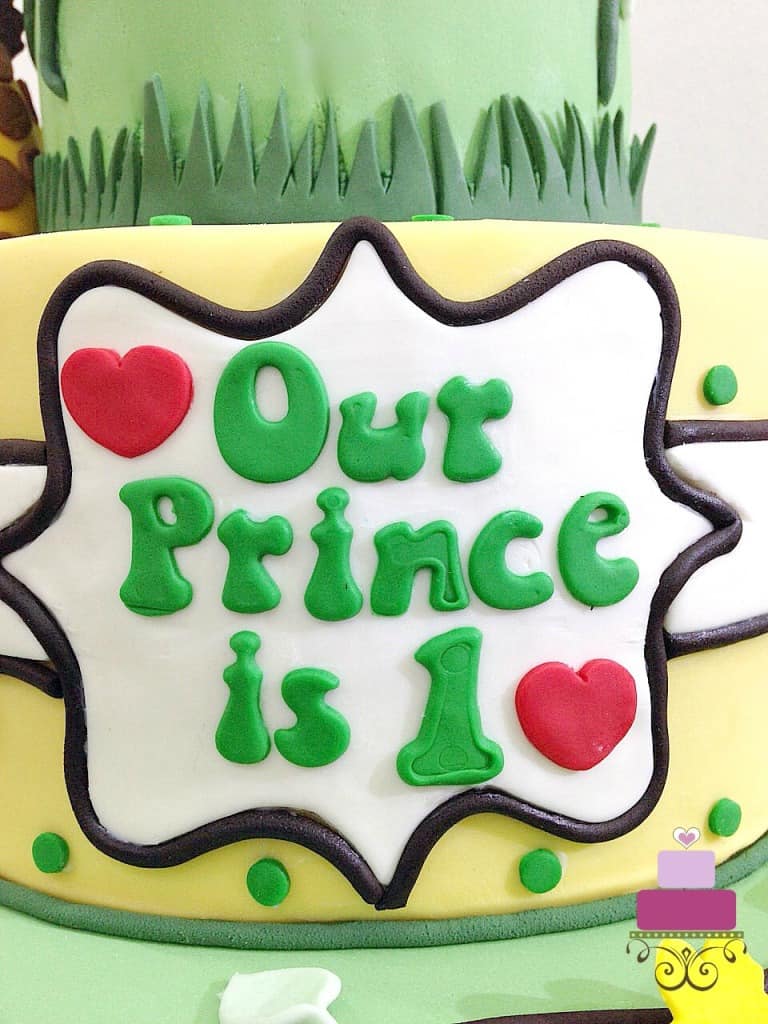
Beautiful wordings on the animals cake
Attaching the copse to the animals cake
- For the third tier, I started by attaching the tree on the side first. I used glue and then that the tree would stick deeply to the side of the block as well as the cake lath. And and then I used my extruder tool to pipe the vines around the elevation edge of the block. I piped these in brown and dark-green.
- Then I added the leaves in random society in a combination of green tones and yellow. I did the same for the top tier. I also added the leaves on the cake board.
The grass border
- And finally, I added the grass borders for both tiers. I rolled and cut my green fondant into long strips and used the pizza cutter to class the grass.
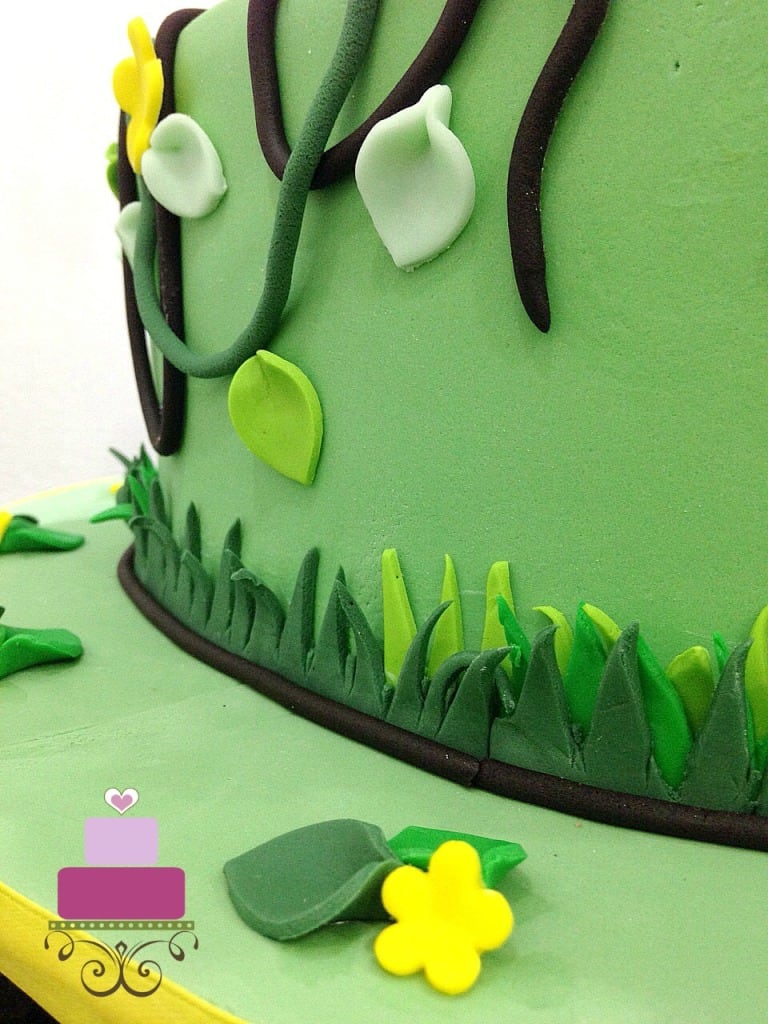
The grass edge on the lesser tier of the animals cake
Tiny block topper with candle
- Next was the tiny birthday block on the peak tier. I fabricated this by hand with light blueish fondant shaped into a tiny block. And and so I added the white icing on top in white, followed past the handmade candle.
A tiny altogether cake and candle as the animals cake topper
- After the cake, I fastened the larger tree on the first tier. Since the body consisted of a number of wires grouped together, it was user-friendly to use the extra wire at the base to hold the tree in place on the cake. I did non poke the entire group of wires into the block. I only used 2 and cut off the residue. And the two that went into the cake were inserted into lollipop sticks beginning and so that there was no straight contact of the wires with the cake.
The side view of the animals cake
Attaching the animals
- And finally, I added the animals. I did this at the party venue which ways I transported the block and the animals separately. All the animals were glued to the cake except for the monkey which was left hanging on the branch by its tail.
The completed jungle animals cake
And that'southward my jungle animals altogether block.
Happy Decorating 🙂
Source: https://decoratedtreats.com/jungle-animals-birthday-cake.html
Posted by: alvarezralmy1981.blogspot.com
0 Response to "How To Make Jungle Animals Out Of Fondant"
Post a Comment